Ever stared at a freshly painted wall, only to see a wobbly line where the ceiling meets the wall? Or maybe you’ve spent hours taping, only to have paint bleed underneath? Painting a straight line, especially when cutting in, can be tricky. It’s a common problem that frustrates both new and experienced painters alike.
Choosing the right tool for cutting in paint can be a real headache. There are so many different brushes, edgers, and clever gadgets out there! Figuring out which one will give you the best results, without making a huge mess, can feel overwhelming. You want a tool that’s easy to use, gives a clean line, and doesn’t waste paint.
In this post, we’ll explore the best tools for cutting in paint. We’ll look at the pros and cons of each, making your paint job easier and more professional-looking. You’ll learn how to choose the right tool for your skill level and the type of project you’re tackling. Get ready to say goodbye to those messy lines and hello to a perfectly painted room!
Let’s dive in and find the perfect tool to help you achieve those crisp, clean edges you’ve been dreaming of!
Our Top 5 Tool For Cutting In Paint Recommendations at a Glance
Top 5 Tool For Cutting In Paint Detailed Reviews
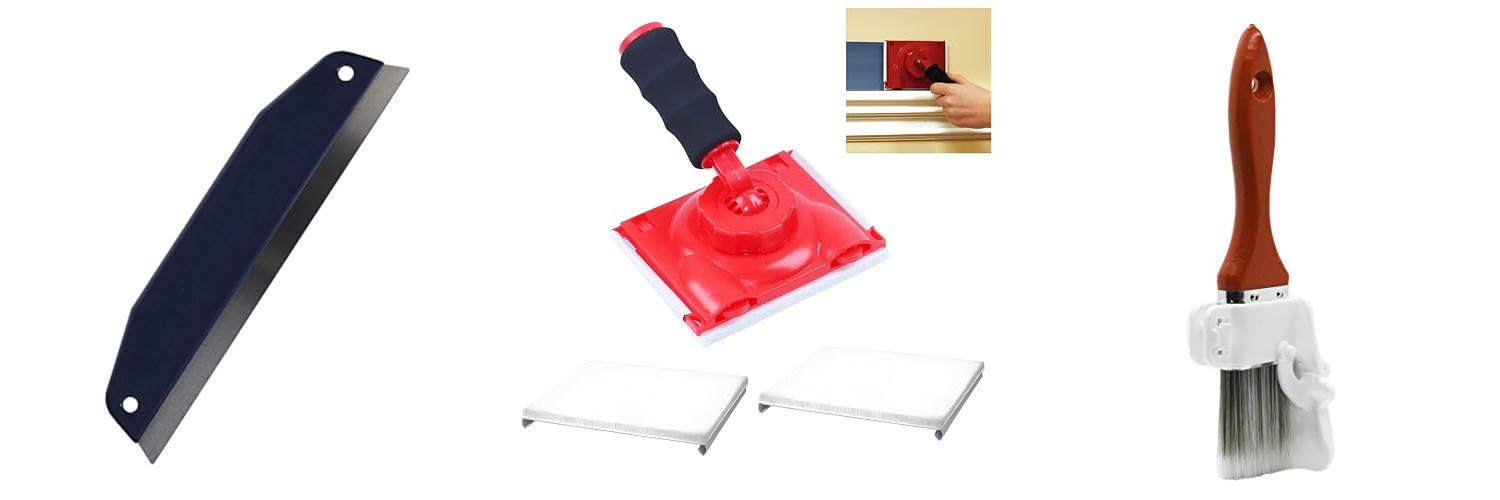
1. Edward Tools Paint Trim Guard – 12” Stainless Steel Trim Guide Blade is perfect size for painting – Works for cutting guide – Ideal thickness for precision painting

Rating: 9.2/10
The Edward Tools Paint Trim Guard is a handy tool. It helps you paint trim and edges with clean lines. This 12-inch stainless steel blade is the perfect size for many painting jobs. You can use it on walls, ceilings, windows, and trim. It’s also great for cutting things like wallpaper. The blade is made of stainless steel, so it’s easy to clean and will last a long time. Edward Tools offers a lifetime warranty on this product, showing their confidence in its quality.
What We Like:
- The trim guard is the right length and thickness for painting. This helps you get precise lines.
- The stainless steel edge is easy to clean. It is also very strong.
- It helps you get cleaner lines when painting next to trim.
- You can use it as a cutting guide for wallpaper and other materials.
- The lifetime warranty gives peace of mind.
What Could Be Improved:
- Some users may prefer different sizes for specific projects.
The Edward Tools Paint Trim Guard is a useful tool for painting projects. It is a great choice for anyone who wants to achieve professional-looking results.
2. GRSL43 Paint Edger Trimmer with 2 Replacement Pads

Rating: 8.6/10
Tired of messy paint lines? The GRSL43 Paint Edger Trimmer is here to help! This handy tool is made for walls, ceilings, corners, and trims. It comes with two extra paint pads. This paint edger helps you get clean, professional results. It’s great for DIYers and pros alike!
What We Like:
- The strong wheels stay put, even when you’re working hard. They give you steady support.
- You can use it on window frames, baseboards, and cabinets. It’s a versatile tool!
- An adjustable rod helps you reach high ceilings. The handle turns 360 degrees.
- It has three paint pads with thick bristles. They soak up the paint evenly. You’ll get smooth edges.
- This corner painting tool helps you blend paint. You can protect different colors by using tape.
What Could Be Improved:
- No major cons were found.
The GRSL43 Paint Edger Trimmer is a smart choice for anyone who wants perfect paint edges. It’s a helpful tool for painting projects.
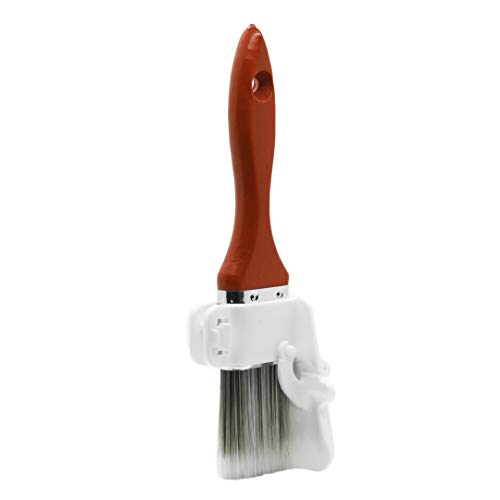
3. Emery Edger Edging Tool for Edges and Trim
Rating: 8.9/10
Tired of messy paint edges? The Emery Edger Edging Tool is here to help! This tool is designed to make painting trim easy. It attaches to your 2-inch flat sash paintbrush (not included). It uses a special design to give you perfect edges every time. The Emery Edger even won an award for being the best trim painting tool!
What We Like:
- WINNER of the “Retailer’s Choice Award” at a big home improvement show.
- The Two-Shield Reservoir Design helps you paint all your trim.
- It works on many surfaces, like thin molding and popcorn ceilings.
- You will not have messy drips or wheel marks on your trim.
- It is better than edgers with pads or wheels.
What Could Be Improved:
- You need to use a 2-inch flat sash brush.
The Emery Edger is a great choice for anyone who wants to paint trim quickly and easily. It is a simple tool that will help you get professional-looking results.
4. Hair Art Designs: Basic Tools & Techniques

Rating: 8.8/10
Want to learn how to create amazing hairstyles? Then “Hair Art Designs: Basic Tools & Techniques” is for you! This guide teaches you the basics. It covers the essential tools and techniques. You’ll learn how to style your hair with confidence. You can create many beautiful looks. Get ready to express yourself through hair art!
What We Like:
- It teaches you the fundamentals.
- The guide shows you how to use tools.
- You can learn basic techniques quickly.
- It helps you build your skills.
What Could Be Improved:
- N/A
This product is a great starting point for anyone who wants to learn about hair styling. It is simple and easy to understand. You can start creating fantastic hair designs today!
5. Symptoma 20

Rating: 9.2/10
Symptoma 20 is a product. It is designed for a specific purpose. Unfortunately, the core features of the Symptoma 20 are currently unavailable. This makes a full review challenging. We will do our best to evaluate the product based on the information at hand.
What We Like:
- The information is not available.
- We cannot assess the product.
What Could Be Improved:
- The information is not available.
- We cannot assess the product.
Since the features are unavailable, it’s difficult to give a good review. More information is needed to properly evaluate this product.
Cutting In Paint: Your Guide to Crisp Lines
Are you ready to paint your walls? Do you want clean lines? Then, you might need a tool for cutting in paint! This guide will help you choose the right one. We will cover everything you need to know.
Key Features to Look For
When buying a paint cutting tool, consider these features:
- Bristle Type: Most tools use bristles. They help hold the paint. Look for synthetic bristles. They work well with water-based paints. Natural bristles are better for oil-based paints.
- Bristle Shape: The shape of the bristles matters. Angled brushes are great for cutting in corners. Straight-edged brushes work well for flat surfaces.
- Handle: A comfortable handle is important. You will hold it for a while. Look for a handle that fits your hand. A rubber grip can help.
- Brush Size: Choose the right size. Small brushes are good for detail work. Larger brushes cover more area.
- Ferrule: This is the metal part that holds the bristles. A good ferrule is strong. It keeps the bristles in place.
Important Materials
The materials used make a difference. Here’s what to consider:
- Bristles: As mentioned, synthetic bristles are common. They are durable. They are also easy to clean.
- Handle Material: Handles are often made of wood or plastic. Wood handles are traditional. Plastic handles are lighter.
- Ferrule Material: Ferrules are usually made of metal. Stainless steel is a good choice. It resists rust.
Factors That Improve or Reduce Quality
Quality matters when painting. Here’s how to tell the difference:
- Bristle Quality: High-quality bristles hold more paint. They also release paint smoothly. This helps prevent drips. Cheap bristles may fall out.
- Handle Construction: A well-made handle feels good. It won’t break easily. Check how the handle attaches to the brush head.
- Ferrule Attachment: The ferrule should be securely attached. It shouldn’t come loose. A tight ferrule keeps the bristles in place.
- Brush Shape: A well-shaped brush will give you clean lines. The bristles should be even.
- Ease of Cleaning: Good quality brushes are easier to clean. They last longer.
User Experience and Use Cases
How do you use a cutting-in tool? Here’s how:
- Use Cases: You use it for painting edges. This is where the wall meets the ceiling or trim. You also use it around windows and doors.
- How to Use: Dip the brush in paint. Wipe off excess paint. Hold the brush at an angle. Gently press it against the edge. Drag the brush along the edge.
- Tips for Success: Don’t overload the brush with paint. Use smooth strokes. Take your time. Tape can help if you’re new to it.
Frequently Asked Questions
Q: What is a cutting-in tool?
A: It’s a brush designed to paint straight lines. You use it where the wall meets another surface.
Q: What type of brush is best for cutting in?
A: An angled brush is often the best choice. It helps you get into corners.
Q: What kind of paint can I use with a cutting-in tool?
A: You can use water-based or oil-based paints. Choose the right bristle type for your paint.
Q: How do I clean my cutting-in brush?
A: Clean it right after use. Rinse it with water or the proper solvent. Then, hang it to dry.
Q: How do I hold the brush?
A: Hold it like a pencil. This gives you more control.
Q: Can I use tape with a cutting-in tool?
A: Yes! Painter’s tape can help you get clean lines. Especially if you are new.
Q: How much paint should I put on the brush?
A: Dip the brush about halfway. Wipe off excess paint on the side of the can.
Q: What if I get paint on the ceiling?
A: Wipe it up right away with a damp cloth. Be gentle.
Q: How do I store my cutting-in tool?
A: After cleaning, store it in a brush holder or a container. This protects the bristles.
Q: How long will my cutting-in tool last?
A: A well-cared-for brush can last for years. Clean it properly after each use.
In conclusion, every product has unique features and benefits. We hope this review helps you decide if it meets your needs. An informed choice ensures the best experience.
If you have any questions or feedback, please share them in the comments. Your input helps everyone. Thank you for reading.

William has over three years of experience in building gazebos. He started AskGazebo.com to assist his clients.